Developer Guide
MyMods is an open source, brownfield project based on the existing Address book Level-3. Contribute to this project if you wish to help us in improving every university student’s life!
- Setting up, getting started
- Design
- Implementation
- Instructions for Manual Testing
- Effort
- Documentation, logging, testing, configuration, dev-ops
- Product scope
Setting up, getting started
Refer to the guide Setting up and getting started.
Design
Architecture

The Architecture Diagram given above explains the high-level design of the App. Given below is a quick overview of each component.
Main has two classes called
Main
and MainApp.
It is responsible for,
- At app launch: Initializes the components in the correct sequence, and connects them up with each other.
- At shut down: Shuts down the components and invokes cleanup methods where necessary.
Commons represents a collection of classes used by multiple other components.
The rest of the App consists of four components.
-
UI: The UI of the App. -
Logic: The command executor. -
Model: Holds the data of the App in memory. -
Storage: Reads data from, and writes data to, the hard disk.
Each of the four components,
- defines its API in an
interfacewith the same name as the Component. - exposes its functionality using a concrete
{Component Name}Managerclass (which implements the corresponding APIinterfacementioned in the previous point.
For example, the Logic component (see the class diagram given below) defines its API in the Logic.java
interface and exposes its functionality using the LogicManager.java class which implements the Logic interface.

How the architecture components interact with each other
The Sequence Diagram below shows how the components interact with each other for the scenario where the
user issues the command delete CS1101S.

The sections below give more details of each component.
UI component

API :
Ui.java
The UI consists of a MainWindow that is made up of parts e.g.CommandBox, ResultDisplay, ModuleListPanel,
StatusBarFooter etc. All these, including the MainWindow, inherit from the abstract UiPart class.
The UI component uses JavaFx UI framework. The layout of these UI parts are defined in matching .fxml
files that are in the src/main/resources/view folder. For example, the layout of the
MainWindow
is specified in MainWindow.fxml
The UI component,
- Executes user commands using the
Logiccomponent. - Listens for changes to
Modeldata so that the UI can be updated with the modified data.
Logic component

API :
Logic.java
-
Logicuses theGradeBookParserclass to parse the user command. - This results in a
Commandobject which is executed by theLogicManager. - The command execution can affect the
Model(e.g. adding a module). - The result of the command execution is encapsulated as a
CommandResultobject which is passed back to theUi. - In addition, the
CommandResultobject can also instruct theUito perform certain actions, such as displaying help to the user.
Given below is the Sequence Diagram for interactions within the Logic component for the execute("delete CS2103T") API call.

DeleteCommandParser should end at the destroy marker (X) but due to a limitation of PlantUML, the lifeline reaches the end of diagram.
Model component

API : Model.java
The Model,
- stores a
UserPrefobject that represents the user’s preferences. - stores the grade book data, semester data, and goal target data.
- exposes an unmodifiable
ObservableList<Module>that can be ‘observed’ e.g. the UI can be bound to this list so that the UI automatically updates when the data in the list change. - does not depend on any of the other three components.
Storage component

API : Storage.java
The Storage component,
- can save
UserPrefobjects in json format and read it back. - can save the grade book data in json format and read it back.
Common classes
Classes used by multiple components are in the seedu.address.commons package.
Implementation
This section describes some noteworthy details on how certain features are implemented.
Obtaining module information automatically:
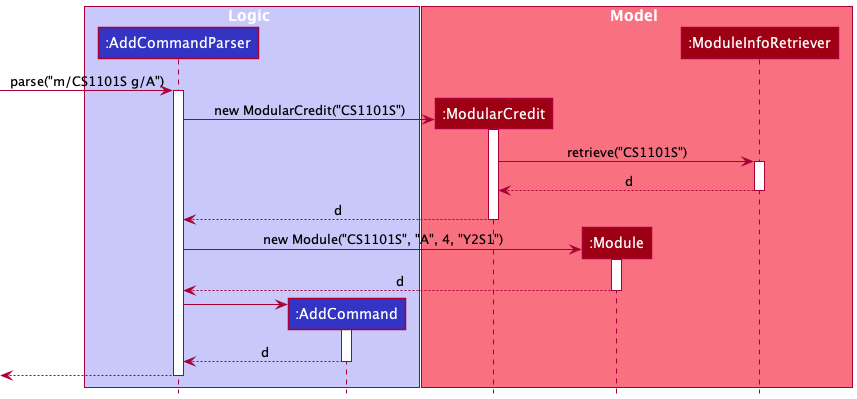
This feature is facilitated by ModuleInfoRetriever, and is used to obtain the number of modular credits
when you are adding a module, or the “su” status of the module when you are recommending S/U options.
It implements the following operation:
ModuleInfoRetriever#retrieve(String moduleName) - Returns a HashMap containing module-related information.
Given below is an example usage scenario and how obtaining module information is used and integrated into
the add command.
Step 1: The user executes add m/CS1101S g/A+.
Step 2: Logic uses the AddCommandParser class to parse the command.
AddCommandParser#parse(“add m/CS1101S g/A+”) is executed, which then executes
(ModuleInfoRetriever#retrieve(“CS1101S”) to retrieve the number of modular credits CS1101S has.
Step 3: During the call of ModuleInfoRetriever#retrieve(“CS1101S”) , it parses the JSON file
moduleInfo.json, and searches the file for “moduleCode” : “CS1101S”, retrieving the following information,
returning it as a HashMap.
Title: “Programming Methodology”
moduleCredit: 4
SU: True
An exception is thrown if the module is not found.
Step 4: The new module constructor is executed with the following arguments,
new Module(“CS1101S”, “A+”, 4, "Y2S1"). An AddCommand object is then returned with the module,
and the new module with modular credit information is saved to storage.
Design Considerations:
Aspect: Whether to allow users to manually overwrite the number of modular credits attached to each module.
- Alternative 1 (current choice): Allow users the choice to manually key in how many modular credits a module has.
- Pros:
- Allows users more flexibility, and enables them to dictate how many modular credits each module has.
- In the event that a module in our database is outdated, users are able to overwrite the outdated modular credits.
- Cons:
- Users may not be fully aware of module details, and may key in incorrect modular credits.
- Pros:
- Alternative 2: Disallowing users to manually key in how many modular credits a module has.
- Pros:
- Users will not be able to input wrong modular credits.
- Modules will always have accurate modular credits, given that our database is accurate.
- Cons:
- In the event that our database is outdated, users have no way of overwriting the modular credits. This renders many functionalities of our application to be hindered, such as the calculation of CAP, which requires accurate modular credits.
- Pros:
Recommend S/U:
Implementation
The Recommend S/U feature works in conjunction with the goal-setting feature.
MyMods will recommend modules to S/U based on the goal that the user has set and the user’s grade.
The implementation of goal-setting is first done by introducing a new model class - GoalTarget.
The GoalTarget class models the 6 different levels following the Honours Classification in NUS.
For the user to set their goal, there is a SetCommand class under the logic commands.
There will be two different variants of the goal command, there is a SetCommandParser class under parser to
handle the different user’s input: goal set and goal list.
The goal of the user will update a field under ModelManager.
User’s goal will be written to and can be read from the gradebook.json file under the attribute
“goalTarget” which will store a default value of 0.
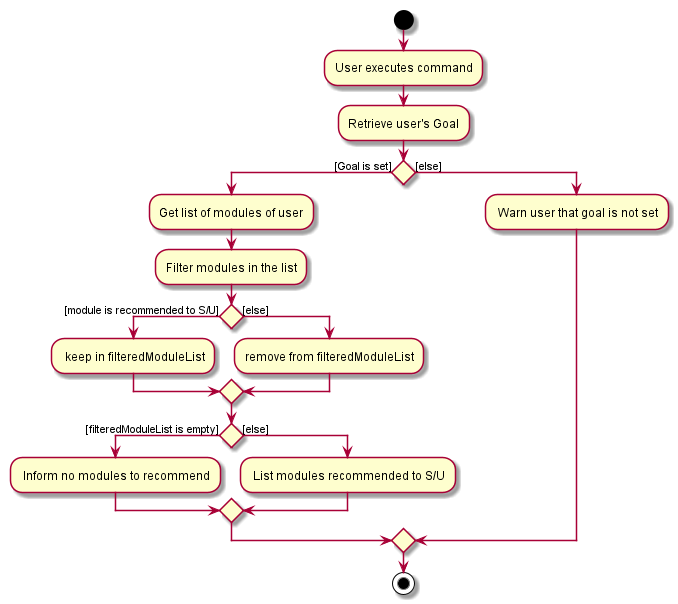
To implement the command RecommendSU, a class RecommendSuCommand is introduced in logic commands.
To determine which module to recommend the user to S/U the method RecommendSuCommand#filterModule() will
retrieve the user’s goal and modules and filter using the following conditions:
-
RecommendSuCommand#isModSuAble(Module mod)– Checks if module can be S/U by NUS based on data filemoduleInfo.json. -
RecommendSuCommand#isGradeBelowGoal(Module mod, GoalTarget goal)– Checks if the grade of the module is below the lower bound of the goal. -
RecommendSuCommand#isGraded(Module mod)– Checks if the grade of the module is valid.
The following activity diagram summarizes what happens when a user executes a new command:
Design Considerations:
Aspect: How to represent the different levels of goals (Highest Distinction, Distinction, Merit, Honours, Pass, Fail)
- Alternative 1 (current choice): Labels each level with a number 1 to 6 and the user inputs the level number to
set the goal.
- Pros:
- Using number to label the goals is easier for the user to type
(eg:
goal set 2instead ofgoal set distinction) - Using an integer value is more efficient for comparison as compared to a String.
- Using number to label the goals is easier for the user to type
(eg:
- Cons:
- Difficult for the user to know which level represents which goal.
- Pros:
- Alternative 2: User key in the full name of the goal level.
- Pros:
- User knows what to key in without referring.
- Cons:
- It is longer for the user to type.
- Pros:
- Justification for choosing Alternative 1: Having a shorter command will be easier for the user.
To solve the con of the user not sure on which level represents which goal, the command “
goal list” is provided.
Dark/Light Mode:
Implementation
The dark and light mode switch is part of the UI implementation that allows the user to instantly switch between two
different styles of the application. It is facilitated by the MainWindow component in the
UI component and the Scene object from the Stage object(private property in MainWindow).
The stylesheet property in the Scene object is manipulated. The two different stylings are supplied by
two CSS files that contain CSS styling for both dark and light mode separately.
The following method in MainWindow facilitates the switching process:
-
MainWindow#setStyleSheet(String cssFileName)- sets a specific CSS file to be the current stylesheet for UI.
Below is the flow of the mechanism behind switching of themes.
- User selects “Light” under “Theme” menu bar.
- The action calls
handleLightThemeSelection()fromMainWindow. -
MainWindowthen call a functionsetStyleSheet("LightTheme)of itself. -
Sceneobject is obtain fromStageobject - An
ObservableList<String>of stylesheets is obtained fromSceneobject - File path to the “Light” CSS file is added as a string that overrides the current
ObservableList<String>of stylesheets
The following sequence diagram illustrates how the program changes the theme of the desktop application.
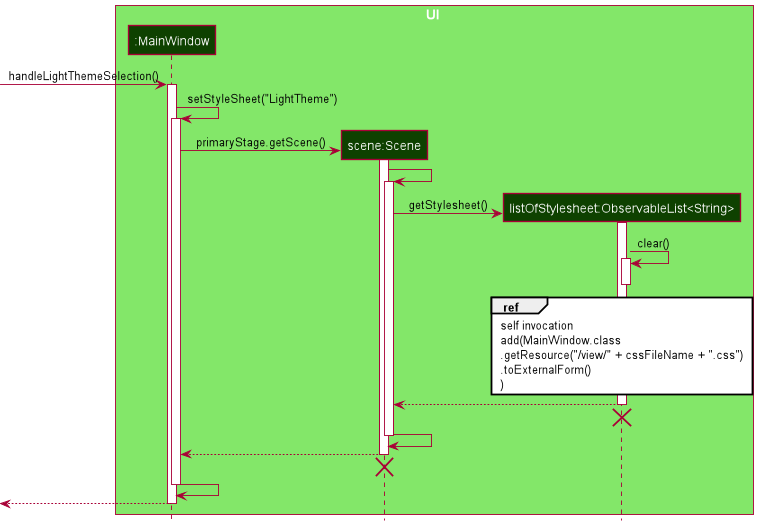
scene and listOfStylesheet should end at the destroy marker (X)
but due to a limitation of PlantUML, the lifeline reaches the end of diagram.
The following activity diagram summarises what happens when a user chooses “Light” under the Theme menu bar.
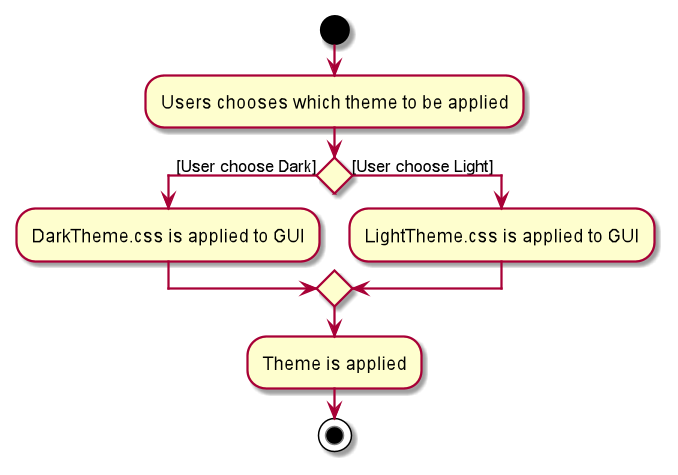
Default theme is decided by the time of the day.
- 7am - 7pm: Light Mode
- 7pm - 7am: Dark Mode
Start Semester:
Implementation
start is a command which allows the user to start modifying the list of modules in the semester which
the user specifies by adding, updating, deleting or S/U-ing the modules in the specified semester.
Modifying the list of modules is only allowed after the user types in start followed by the semester
which the user wishes to edit the module list of.
A class StartCommand is added in the commands folder under logic to execute the command start.
A singleton class SemesterManager to control the semester is added in the semester folder under model
to retrieve the current semester the user is in and set the current semester to a specified semester.
The SemesterManager class is created as a singleton class as there should only be one instance of a controller class.
StartCommand#execute() gets an instance of the SemesterManager class via the static SemesterManager#getInstance()
method to set the current semester to the semester input by the user via SemesterManager#setCurrentSemester().
SemesterManager#isValidSemester() ensures that the user keys in a valid semester from Y1S1 to Y5S2
(Y5S1 and Y5S2 in the case of ddp students) and prevents starting an invalid semester.
The following sequence diagram shows how the start command works:
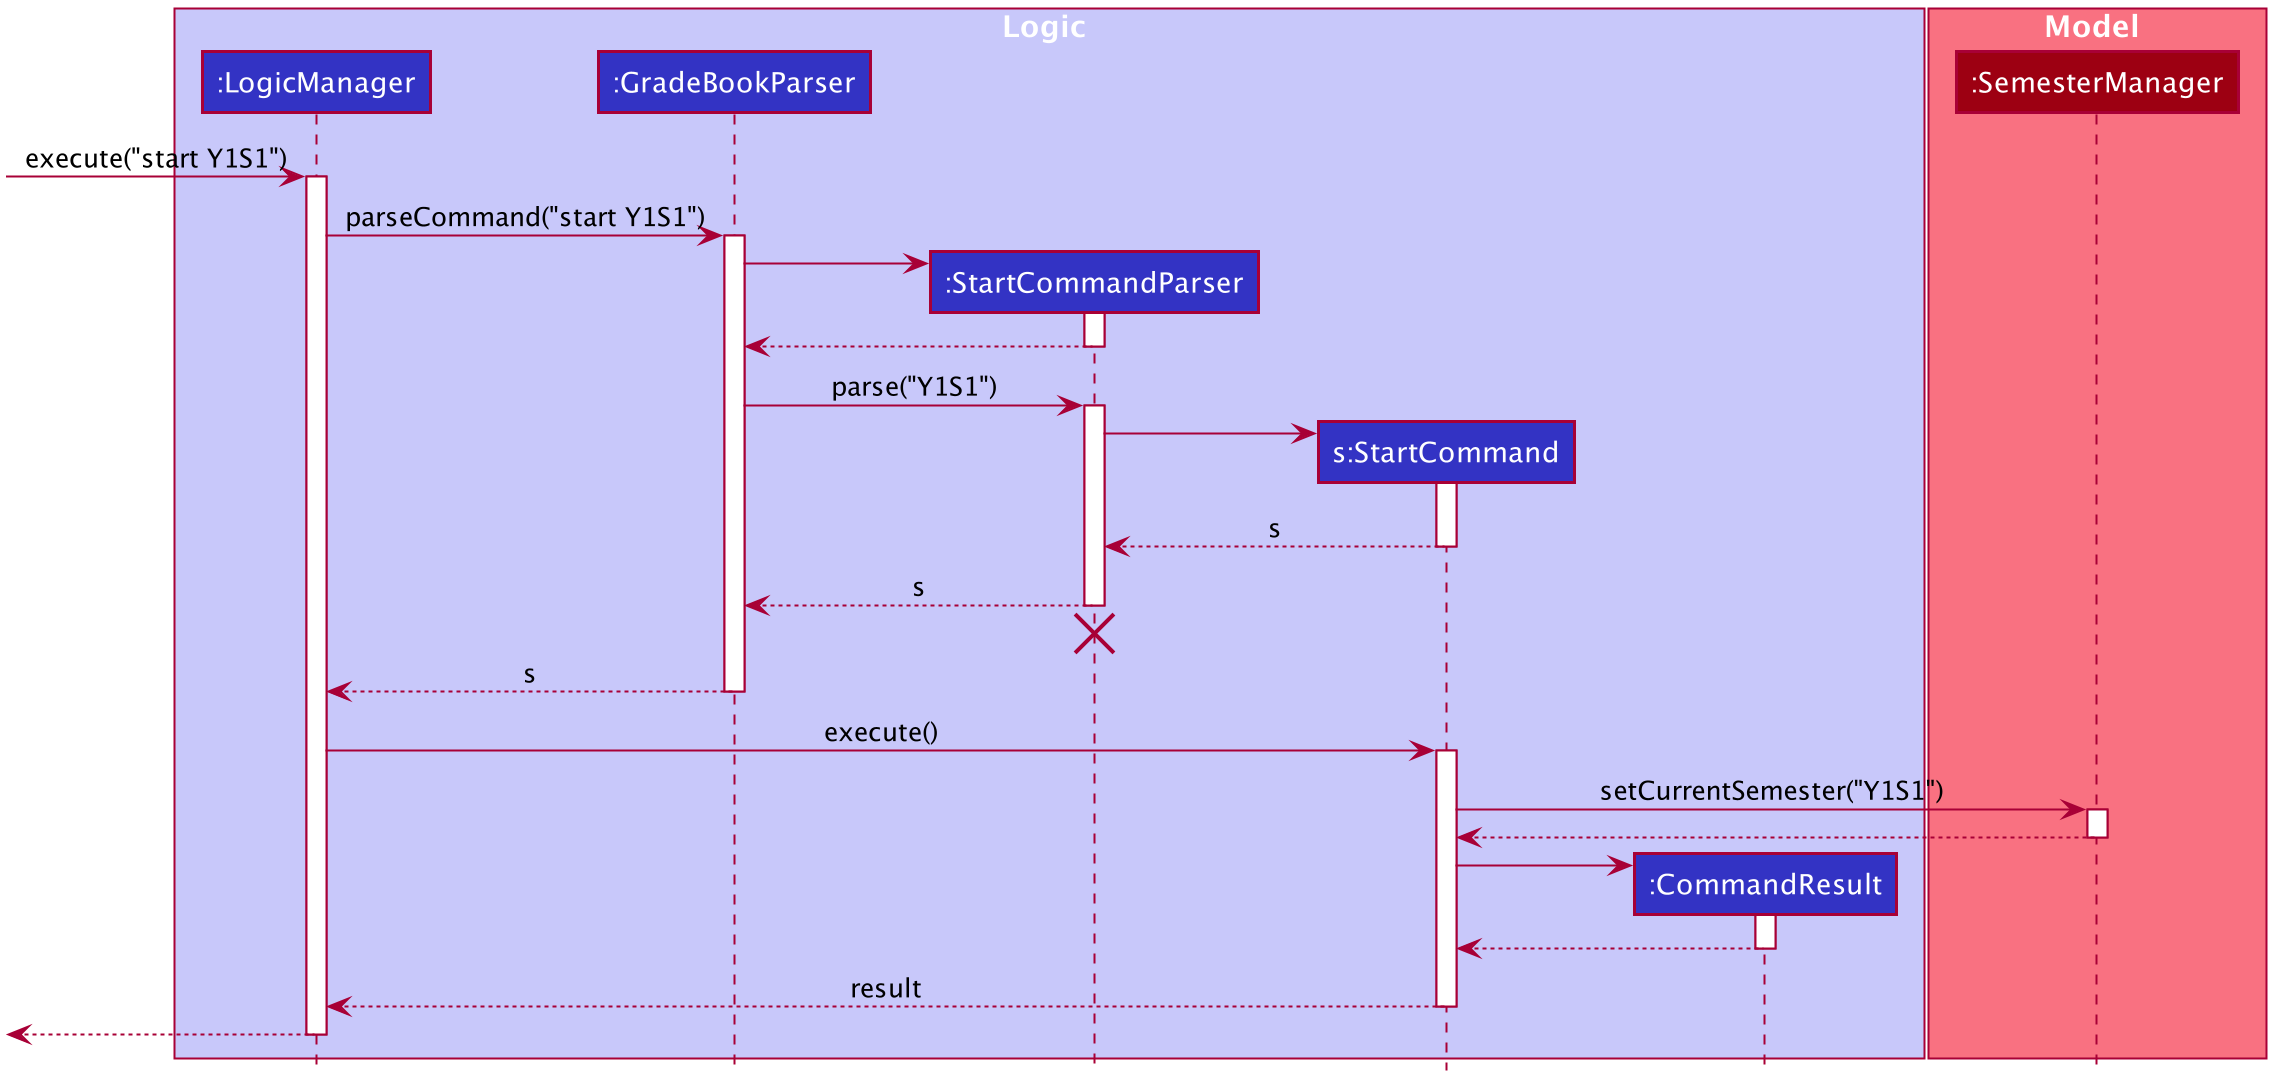
The following activity diagram summaries what happens when a user executes the start command:
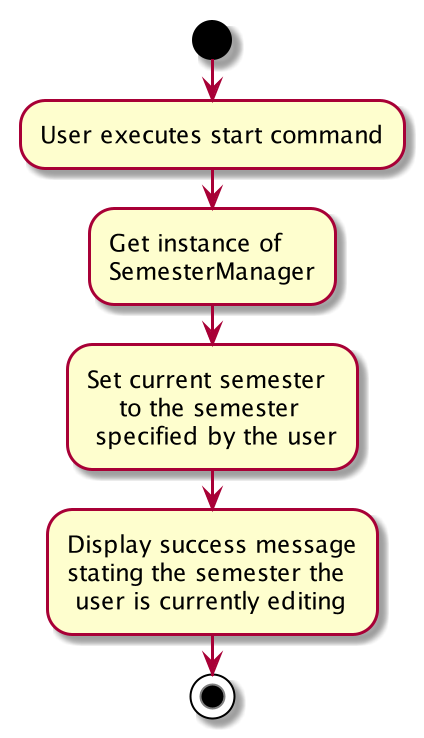
Design Considerations
Aspect: How does the user edit the list of modules in a specified semester
- Alternative 1 (current choice): the user can input the
startkeyword followed by the specific semester which the user wishes to add, update, delete or S/U modules in (eg.start Y1S1).- Pros:
- Users can key in fewer words which is more convenient, fuss-free and time-efficient and prioritises fast-typists.
- It is a more intuitive approach.
- Cons:
- The format is different from the other commands (eg.
add,update) and thus the user has to familiarise himself or herself with a more foreign command.
- The format is different from the other commands (eg.
- Pros:
- Alternative 2: the user can add, update, delete or S/U modules in a specific semester
by stating the following input (eg.
add m/CS1101S g/A s/Y1S1).- Pros:
- The format is more similar to the other commands and thus the user will be more familiar with it.
- Cons:
- The user has to type in a much longer command which can be quite a hassle and inconvenient, and it takes up more time which does not prioritise fast-typists.
- Pros:
- Justification for choosing alternative 1:
- It is more convenient, fuss-free and time-efficient for the user to key in a much shorter command and hence prioritises fast-typists. It enables users to switch from one semester to another semester very quickly to edit the list of modules in different semesters, as compared to having to key in a long command just to modify one module in a semester.
- Since the command is pretty intuitive, the fact that the format of the command is rather different from the other commands is not a major problem and users will be able to pick it up quickly.
Show progress towards target CAP:
Implementation
The progress feature works in conjunction with the goal-setting feature.
The user will first need to indicate their desired CAP using the goal command.
Users can then use the command progress to calculate the required average CAP
they have to obtain in their remaining modules in order to achieve their
target CAP. The user can include the string ddp to indicate if they are taking
a double degree programme (e.g. progress ddp).
A ProgressCommand class is added to commands under logic to execute the required
CAP calculation. The calculation process is done as shown below:
- User enters their target CAP using
goalcommand - Info about current CAP and MCs taken are retrieved from the
ModelManagerclass - Total MCs required is determined by whether user is in double degree programme
or not (e.g. user input is
progress ddpor justprogress) - Target CAP is retrieved from the
ModelManagerclass - Required CAP from remaining modules is calculated.
The following activity diagram shows what happens when a user calls the progress command:
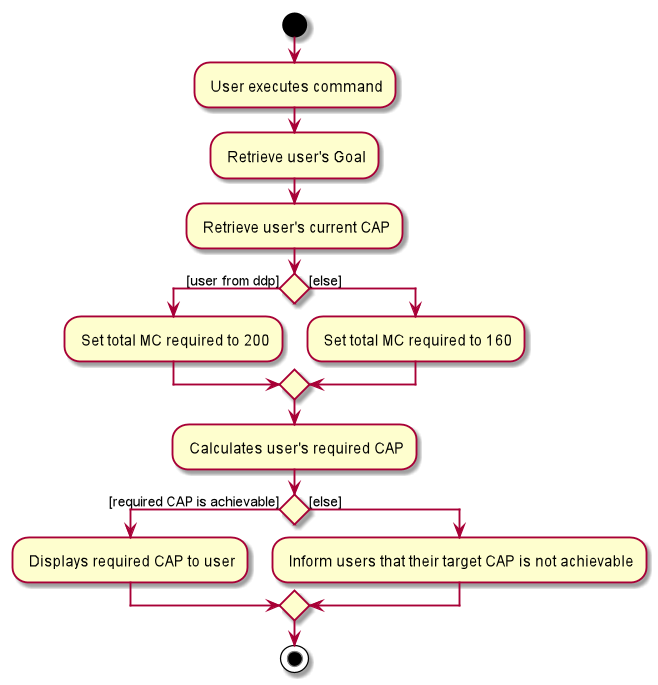
Design Considerations
Aspect: how does the user input their desired CAP.
- Alternative 1: using a prefix such as
c/followed by their desired CAP (e.g.progress c/ 4.32).- Pros:
- Users can input the exact CAP number they want to achieve to get a more specific CAP requirement for their remaining modules.
- Cons:
- Users have to input their desired CAP everytime they use the
progresscommand. - User does repeated work, since they need to set their CAP target again to use other commands like
RecommendSU.
- Users have to input their desired CAP everytime they use the
- Pros:
- Alternative 2 (current choice): using the
goalcommand (e.g.goal set 2).- Pros:
- Length of progress command is reduced, users type lesser words.
- Users only need to input their target CAP once, unless they want to change it.
- Cons:
- CAP target is not as flexible as it is limited to the levels of goals (Highest Distinction, Distinction, Merit, Honours, Pass, Fail).
- Pros:
- Justification for choosing alternative 2:
- Firstly, a shorter command is more convenient for the user to quickly find out the required CAP for their remaining modules.
- Secondly, most users do not have an extremely specific CAP target they want to achieve (e.g. 4.32) but rather one of the goal levels (e.g. Distinction), hence using the
goalcommand to set their target CAP is sufficient.
Instructions for Manual Testing
Launch and shutdown
- Initial launch
a. Download the jar file and copy into an empty folder.
b. Double-click the jar file Expected: Shows the GUI. The window size may not be optimum.
- Saving window preferences
a. Resize the window to an optimum size. Move the window to a different location. Close the window.
b. Re-launch the app by double-clicking the jar file.
Expected: The most recent window size and location is retained.
Adding a module
- Adding a module while editing a semester
a. Prerequisites: Start editing a semester using thestartcommand.
Currently editing a valid semester with no modules in the entire app added yet.
b. Test case:add m/CS1231S g/A
Expected: Module “CS1231S (4MCs)” is added to the current semester, with “Grade: A”. CAP in the status bar is updated.
c. Test case:add m/CS1101S
Expected: Module “CS1101S (4MCs)” is added to the current semester, with “Grade: NA”. CAP in the status bar is not updated.
d. Test case:add m/GER1000 mc/8
Expected : Module “GER1000 (8MCs)” is added to the current semester, with “Grade: NA”. CAP in the status bar is not updated.
e. Test case:add m/GER1000 g/A
Expected: Unable to add the module as it already exists in your module list.
f. Test case:add GEQ1000 A+
Expected: Invalid command format.
g. Other incorrect add commands to try:add,add mod/GEQ1000,…
Expected: Similar to previous.
- Adding a module while not editing any semesters
a. Prerequisites: Not editing any semesters. (The status bar shows “Currently editing: NA”)
b. Test case:add m/GEQ1000
Expected: Unable to add module as no semester is being edited, command result prompts to start a semester before modifying the module list.
Updating/SU-ing a module
- Updating a module while editing a semester
a. Prerequisites: Start editing a semester using thestartcommand, and add the module “CS1101S”, with Grade “A”. Currently editing a valid semester with the module “CS1101S (4MCs) Grade: A” added inside.
b. Test case:update m/CS1101S g/B+
Expected: Updates the module “CS1101S”, replacing the grade from “A” to “B+”.
c. Test case:su CS1101S
Expected: Successfully updates the grade of “CS1101S” to “SU”.
d. Test case:update m/ST2334 g/B+
Expected: Unable to update any module as the module name provided is invalid.
e. Other incorrect update commands to try:update,update ST2334,...
Expected: Invalid command format.
- Updating a module from another semester
a. Prerequisites: Currently editing the semester “Y2S1”. A module was previously added in another semester. e.g. the module “CS1101S” was previously added in semester “Y1S1”.
b. Test case:update m/CS1101S g/B+
Expected: Unable to update module as the module you are trying to update is in another semester.
- Updating a module while not editing any semesters
a. Prerequisites: Not editing any semesters. (The status bar shows “Currently editing: NA”)
b. Test case:update m/CS1101S g/B+
Expected: Unable to update any module as no semester is being edited, command result prompts to start a semester before modifying the module list.
c. Test case:su CS1101S
Expected: Similar to above.
Recommending modules to SU
- Recommending modules to SU with valid modules to SU
a. Prerequisites: A goal has been previously set usinggoal set. For the purpose of the test cases below, we would be assuming the current goal set is 1. (i.e. the commandgoal set 1was entered). There are currently 2 modules added and listed, “CS1101S (4MCs), Grade: C+”, and “CS1231S (4MCs), Grade: A”.
b. Test case:recommendSU
Expected: The module CS1231S is recommended.
c. Test case:recommendSU y2s1
Expected: Invalid command format, as there should be no input after recommendSU.
d. Other incorrect recommendSU commands to try:recommendSU all,recommendSU CAP5,…
Expected: Similar to previous.
- Recommending modules to SU with no valid modules to SU
a. Prerequisites: A goal has been previously set usinggoal set. For the purpose of the test cases below, we would be assuming the current goal set is 1. (i.e. the commandgoal set 1was entered). There are currently no modules added.
b. Test case:recommendSU
Expected: No modules would be recommended to S/U based on your goal.
Effort
Difficulty level
The overall difficulty level of our project is high as we were met with numerous challenges which required substantial effort to overcome. Even though the features to be implemented are divided among our team, the features are often intertwined with each other and we have to work closely with one another and make edits after implementing and testing. We have to continuously update and improve on the features we have implemented even after we have successfully implemented the entire feature and integrated it into the rest of the code base. Debugging is another area which introduced significantly challenging obstacles - both locating bugs and solving them completely.
Challenges faced
As our project has a specific target audience, i.e. NUS students, we have to consider specific scenarios that will cater
to the various types of students and modules. For example, special terms semesters, double degree programme students,
modules that do not exist in our database are considerations that we will have to factor in despite the majority of NUS
students not needing to use it. There is a lot of research to be conducted to ensure that our project is up to date and
accurate. This includes calculation of CAP, rules and criteria that NUS allows a module to be S/U, maximum and minimum
modular credits (MCs) of a module in NUS.
Technical challenges aside, another challenge that we faced is inability to meet up physically due to the COVID-19 pandemic.
The process of all of our project development is discussed and implemented online. To overcome this challenge, our team
sets up weekly online meetings and we ensure that the tasks allocated to each individual are distributed evenly and are
done before the appointed deadline. Communications are made clear and transparent to avoid miscommunication.
Effort required
From conceptualizing our project to implementing and testing our product, there are a lot of considerations and work to be done by each member of our team. We set our weekly online meeting every Sunday to discuss what needs to be done by the end of the week and also on issues to set the direction of our project. Work is then divided into equal proportions and allocated randomly. We then spend the next few days to complete our tasks and we will meet again before the deadline for that week to consolidate everything.
Achievements of the project
Our project is an innovative solution to the problem which many NUS students face: spending large pockets of time at the
start of every semester to do module planning and goal setting, and at the end of every semester to calculate their CAP
and decide on which modules to S/U so as to achieve their goal and track their progress towards it. With MyMods, NUS
students will spend significantly less time on such manual, mundane and repetitive tasks and can channel their precious
time and energy on more important tasks. Together with the aesthetically-pleasing and intuitive user interface of MyMods
ensures a fuss-free, seamless and enjoyable user experience.
Our application is capable of the following features:
- Allows users to set a goal out of the 6 different goals MyMods offer with each covering a specific cap range.
- Allows users to track their progress towards their goal as they will be informed with the average CAP needed for their remaining modules to achieve the goal they have set.
- Provides users with personalised and accurate recommendations on which modules to S/U based on the individual’s specific goal, current grades and CAP.
- Automatically and instantly calculates and updates the CAP after every modification the user makes - including adding, deleting, updating, and S/U-ing modules.
- Allows users to start modifying the list of modules in a specific semester by adding, deleting, updating or S/U-ing module(s) and also stop making modifications.
- Provides users with two different themes - light and dark mode which will be set automatically according to the time of the day. Light mode will be automatically set as default from 7am to 7pm, and it will be switched to dark mode automatically from 7pm to 7am. Users can manually select either light or dark mode at any particular time.
- Allows users to find specific modules by their module codes.
- Allows users to view the entire list of modules in all semesters at any point in time.
- Allows users to navigate into a specific semester and view the list of modules in that particular semester.
- Provide assistance to users who are lost amidst navigating MyMods with a summary of the commands available.
Documentation, logging, testing, configuration, dev-ops
Product scope
Target user profile:
- NUS students
Value proposition: You type, We track.
Track and view your modules and grades efficiently, anytime anywhere.
User stories
Priorities: High (must have) - * * *, Medium (nice to have) - * *, Low (unlikely to have) - *
| Priority | As a … | I want to … | So that I can… |
* * *
|
NUS student | add the modules taken and grades attained | view them anytime anywhere. |
* * *
|
NUS student | add my modules taken to reflect my CAP, and be able to update those modules when I S/U it to reflect my updated CAP | I can view my new CAP. |
* * *
|
NUS student | view my current progress of my modules taken and my CAP | have a gauge of how I am doing in school. |
* * *
|
impatient NUS student | calculate my CAP as fast as possible without doing any calculations myself | use the time that will be spent on doing manual calculations more productively. |
* *
|
NUS student | delete a module taken or the grade attained in the event that I decide to drop the module | I am able to view an updated list of the modules I am currently taking and view my CAP without the grade from the dropped module. |
{More to be added}
Use cases
(For all use cases below, the System is the MyMods and the Actor is the user, unless specified otherwise)
Use case: Delete a module
MSS
- User requests to list modules
- MyMods shows a list of modules he/she has taken
- User requests to delete a specific module in the list
- MyMods deletes the module
Use case ends.
Extensions
- 2a. The list is empty.
Use case ends. - 3a. The given index is invalid.
- 3a1. MyMods shows an error message.
- Use case resumes at step 3.
Use case: Add a module
MSS
- User enters academic semester to edit
- MyMods shows the academic semester and a list of modules he/she has taken
- User requests to add a specific module into the list
- MyMods adds the module
Use case ends.
Extensions
- 1a. Academic semester not found
Use case ends. - 3a. Module moduleName already exists.
- 3a1. MyMods shows an error message.
- Use case resumes at step 3.
Use case: View CAP
MSS
- User requests to show CAP
- MyMods shows CAP for the latest completed semester
Extensions
- 1a. No modules has been added, CAP is undefined
- 1a1. MyMods shows an error message suggesting user to add modules
Use case ends.
- 1a1. MyMods shows an error message suggesting user to add modules
Non-Functional Requirements
- Should work on any mainstream OS as long as it has Java
11installed. - Should be able to hold up to 1000 modules without a noticeable sluggishness in performance for typical usage.
- A user with above average typing speed for regular English text (i.e. not code, not system admin commands) should be able to accomplish most of the tasks faster using commands than using the mouse.
{More to be added}
Glossary
- Mainstream OS: Windows, Linux, Unix, OS-X